
By Jon Baker
Occasionally all systems go through the process of being disconnected. Systems go through several transformations during their lifetime: gear is swapped or upgraded, people move from one location to another forcing system upheaval, products fail and must be returned to an authorized repair facility, or sometimes we just need to do a little cleaning. We all know that audio and video equipment are extremely effective at attracting air-born particles, and in order to keep your system in tip-top shape, one must go through the process of disconnecting an audio or video system component by component. Trust me, there’s nothing more frustrating than going through this tedious process, only to find out that a cable or component has decided not to work or even worse, break. Unfortunately, this can easily happen to cables if handled improperly.
To help mitigate this whole process, I have put together easy, step-by-step instructions on how to safely disconnect and clean your audio/video cabling. I know, you’re thinking, “This is easy, and a no-brainer, and why are you bothering me with this?” Well, you’d be surprised—even many of the professionals get this wrong! Following the basic cable disconnecting protocol detailed below will help to extend the life of your investment, achieve maximum performance and safeguard your system from potential damage. Moreover, taking the extra steps to clean the cable connections and the cable itself will produce immediate performance gains.
**Before you get started, power down all components in the system. If the component features a master switch (rocker or toggle), this switch should be turned to the off position. **
Disconnecting
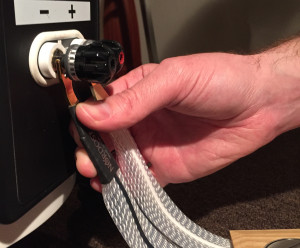
Unplug your system beginning with the power cable(s) at the wall, followed by the power cords at the component. From this point, it doesn’t really matter in which sequence you unplug the system. In order to remove your power cables correctly, keep one hand on either the wall or the component, and with a firm grip on the connector, disconnect with your other hand.
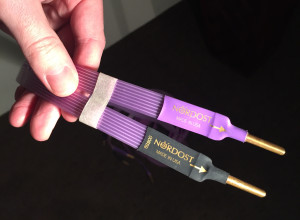
Now it’s time to tackle interconnects and speaker cables. This is where organization becomes important! All Nordost cables are directional, and each cable has an arrow showing the direction of the signal flow. We recommend removing the cables from your system piece by piece, marking both ends (ex. amp end or speaker end) of each cable with tape as you’re taking out the cables from your system. By doing this, you will insure that the system is re-connected exactly the way it was disconnected.
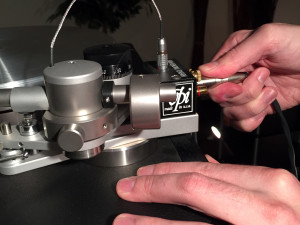
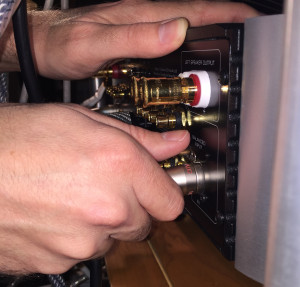
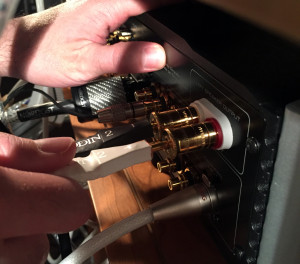
When removing interconnects with RCA terminations, place fingers on the connector and slightly rotate clockwise as you’re pulling the connector out. For XLR cables, simply depress the lock or latch with fingers on the connectors and pull straight out.
For speaker cables with spade connectors, completely unscrew the binding post until contact is no longer made. Pull up or down from the connector depending on its orientation to remove the connector from the post. To remove banana connectors, carefully pull by gripping the connectors.
Cleaning
While your system is completely powered down and disconnected (especially if it’s been a long time since the system has been stripped down to its basic components), take the extra step to clean your cables. For this, you will need the following items:
1) A can of electrical contact cleaner
2) Two Microfiber cleaning rags
3) Q-Tips
4) A cloth dampened with distilled water
5) A bottle of Nordost ECO 3X solution.
Now it’s time to get down to cleaning. For speaker and power cables, simply apply a scant amount of the electrical contact cleaner (both Craig Pro Gold and Deoxit work extremely well) to one of the microfiber cloths and carefully clean each connector. This will remove any small particles of dirt, dust or oxidation on the surface of the connector. With your second, dry microfiber cloth, remove any of the cleanser remaining on the connector. Repeat the process for each end of your speaker cables and the male ends of your power cables. Because of the small space within the connectors of interconnects, they must be handled a little bit differently. Apply a few drops of the connector cleaning solution to a Q-Tip and carefully insert the Q-Tip in-between the center-pin for the RCA and the collar, or the three pins and the collar on XLR cables (try your best not to get any of the fibers from the Q-Tip caught on any of the pins or internal parts within the collar). Too much solution on the Q-Tip might result in excess fluid being squeezed from the Q-Tip and create a bit of a mess, so use the cleaning solution sparingly.
Even though Nordost uses premium quality insulation exclusively, from our White Lightning range all the way through to our flagship Odin 2 range, that doesn’t make it immune to static build-up. Over time and use, cables pick up static charge. This problem gets worse depending on the time of year; static charge is further amplified from disconnecting cables and placing them on the floor (especially carpeted floors). To dissipate this charge, take your dampened cloth and wipe down the cables (for speaker cables, make sure both sides have been cleaned). Spray the second microfiber cloth with Nordost ECO 3X and wipe down the outer jacket of the cable. This will help prevent future build-up of static charge on the cable. Do not use ECO 3X on the connectors as it can leave residue that can prohibit the cable’s ability to work effectively.
Thank you for this common sense approach to this problem. it was my first guess and you just reaffirmed my suspicion.
We’ve been on the road and playing hard . So gear was being used rather hard, what I started to notice on two different shows was whenever we would move our Shure Beta 87 condenser microphones an annoying clicking and popping sound would occur. At the time I thought the cables I had built ( using Canare Quad XLR double shielded cable and Neutrik ends were failing . ). I began to to wonder if I needed to go into debt to buy new super expensive Mogami XLR microphone cables . But since we just purchased all new gear QSC K.2 speakers and Mackie Dl 1608 and DL 32R all new Drum miss Audix D series and I5 microphones. I failed to think about my road worn hand built cables. Now I can sleep knowing what must be done.
Then once we returned home I remembered that we had experienced a very similar oddity of crackling and popping after an outdoor event where the XLR cables had been on the ground and at the end of the gig it rained. So I took each and every cable and dried them carefully ( by actually pulling apart the Neutrik ends and spraying unto a cloth and Q tips to clean each and every end .
The very last gig I visually inspected myXLR cables and noticed the Neutrik boots were deteriorating and fraying. So it looks that while I’m cleaning I may be rebuilding all the cables . Removing old worn boots and replacing them with new ones. Re vamping the heart of the problem.
I am glad that you found this post so helpful! Happy cleaning!
Thanks for pointing out that the solution should not be too much to prevent leakage. I will keep that in mind since my husband and I plan to buy our very own stereo system, and we need to learn how to maintain it properly since it is a big purchase as well. We will use the stereo system for the house party that we also plan to have this coming Christmas season.